We’ll start off with our latest project – re-tasking an old refrigerator to use as a fish tank and water source for my plants. It took several weekends to put together, mostly due to logistics and getting things right the first time (hopefully). As of this writing, it’s not completely finished, but it is completely operational. I’m not sure I have many projects that I could consider ‘completely finished’.
Summary
The Refrigerator is a project that is part of an overall bigger project that includes ‘The Trough’. We had an old refrigerator that stopped working and decided to put it to use. I couldn’t haul it off and the pickup guys only wanted working appliances… go figure. So my wife said… let’s put fish in it! My heart sank… I had other plans and just didn’t want to go there. However, I am really glad I listened because this project has turned out GREAT!
Design Concept
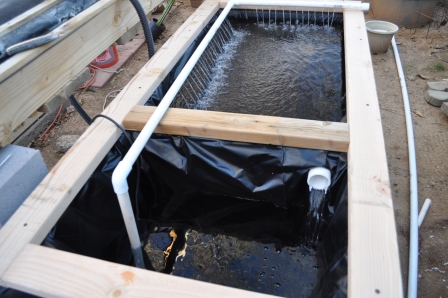
The design for this tank is to have the large compartment for fish with a 2″ PVC overflow drain into the small compartment which acts as a sump. In the sump, there are two 600/gph pumps, one pushes water back into the main compartment through a 3/4″ pvc pipe drilled with holes for aeration and the second pushes water through a 1″ flex pipe to six buckets with plants. We’ll cover the trough design in another entry. The buckets drain into a liner filled trough which then drains back into the sump. The expanded clay pebbles in the buckets act as filtration media for the fish waste. The main consideration I like about this design is the compartment holding the fish will always stay at the same water level, no matter what the level is in the sump, barring a catastrophic leak – hence, the importance of doing a plumbing and water check before adding your fish.
We started off with a junk refrigerator that was stripped of all mechanical items, such as the compressor, tubing and internal shelves. Essentially, just the shell. One of the reasons I really like this approach is we have a great starting point – a strong, insulated box with two compartments. We leveled the ground, put down three concrete landscape blocks and set the fridge on them. Calculating the liner size, I found that I needed to get 2 each 7’x10′ liners from the local box store. They cost about $35.00 each. I didn’t want to mail order custom sizes as I wanted to get the project underway quickly. I did a calculation to see if I could have cut one larger liner in two pieces, but the numbers didn’t work out. If you are doing this yourself, you will need to check it out to see if it is cheaper. The pumps are 600/gph fountain pumps bought at Harbor Freight. Using the 25% discount coupons I have, they weighed in at $30.00 each. I had the PVC laying around from other projects, but needed two more 2″ pipe clamps for the compartment overflow drain. All together, I think I invested about $150.00 in this project. What makes me happy though, is the pumps were already purchased last year.
Parts
1 used refrigerator
2 pond liners, sized to fit
1 pump (recommend 600+ gallons per hour)
1ea 10′ x 3/4″ PVC schedule 40 pipe
1ea. 3/4″ threaded PVC male (threaded) to female 3/4″ slip fitting (screws into pump
1ea. 3/4 PVC elbow
1ea. 3/4″ PVC tee
2ea. 3/4″ PVC caps
1ea. 2″ x 8″ PVC pipe
2ea. pipe clamp for 2″ pipe – better get one that opens to at least 2.5″
3ea. 2″x4″x8′ lumber for top frame (1st layer)
Construction
Step 1: start off by stripping everything out of the refrigerator that won’t be needed. Check for anything inside that may poke through the liner. Don’t forget that water weighs approximately 8 pounds a gallon, so if your fridge can hold 100 gallons, that’s 800 pounds of water pressing down on the liner against anything in the compartment.
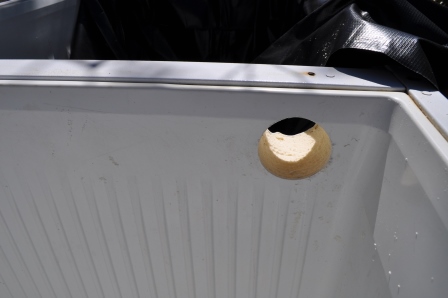
Step 2: Drill a 2″ hole from the freezer section to the main section. Make it fairly high up as this hole will be the highest point you will have water in the main compartment. The inside of my fridge was molded plastic with solid foam core. I had to drill from one side and then the other. Use a long drill bit to make your pilot hole from one side to the other and use that hole to line up your hole saw. Use what ever you think will work, however, I don’t recommend a paddle bit. I bit the bullet some time ago and purchased a Milwaukee chuck that allows me to put almost any size hole saw onto it.
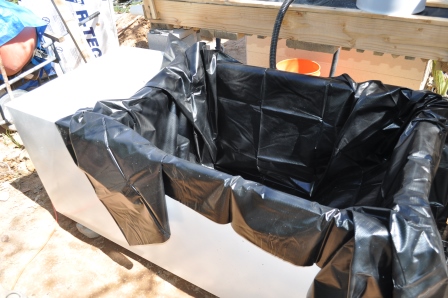
Step 3: fit the first liner in the main compartment. It’s a flat sheet going into a three dimensional hole, so you will have to fold it to fit inside, just like wrapping a present but in reverse. Some people like to fill it with a bit of water to make sure they don’t get surprises.
Step 4: the scary part – cutting the pass through hole in your liner. Perhaps I will write a blog just for this part, but I’m not there yet. I cut a hole about 1 – 1/2″ for a 2″ pipe pass through. Don’t take this measurement as gospel. Your liner may be different and stretch differently. I coated the 2″ PVC pipe with clear silicone sealer. I pushed and cajoled the pipe through the smaller hole in the liner. I then tightened the pipe clamp on over the liner. Just to be sure, I coated the pipe clamp with silicone also. Take your time with this or you will be buying another liner.
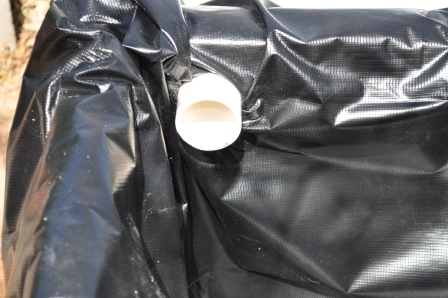
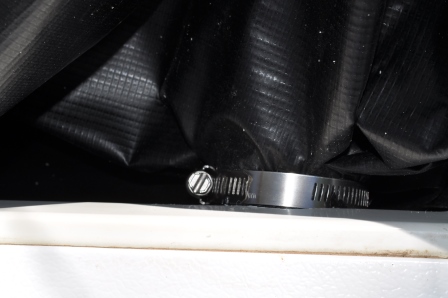
Step 5: fit the second liner in the freezer section. Line it up carefully with the 2″ pipe coming through from the main compartment. Make a small hole in this liner. Be sure you have the pipe clamp on the pipe before you push the liner over the end of the pipe. Once you have the 2″ pipe through, you will have to work hard to get everything lined up nicely. Folks, this doesn’t have to be perfect. The overflow side should NEVER have water coming close to it.
Note: You should NOT trim any excess pond liner material at this time. I did and it was a close fit. Wait until you have filled it completely with water before putting the knife or scissors to your excess liner.
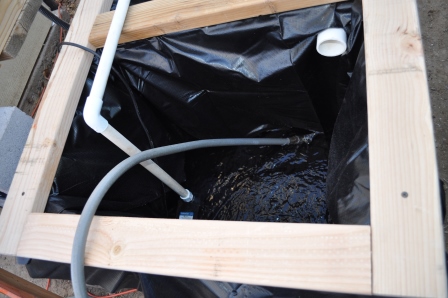
Step 6: Attach the threaded fitting to your pump. Cut the 3/4″ PVC into lengths to come out of the bottom of the freezer/sump section to the first elbow. Be sure to take into account the thickness of the wood you are using to frame the top.
Note: The wood frame is not just for decoration, it keeps the liner firmly in place.
Step 7: Cut another piece of 3/4″ PVC that will go from the elbow, across the dividing partition and most of the way across the main section. I can’t give you dimensions here because your fridge may be smaller or bigger than mine. Attach the tee PVC onto the end and add another piece of PVC to reach the far side. Put a cap on that end. Put one final piece of PVC into the remaining tee and extend it across the fridge frame to the opposite side. Cap the open end with another PVC plug.
Note: I dry fit all the parts. I am even running water at full pressure through the pipes without any leaks. It’s a good idea to make sure everything is set up correctly before you commit it with PVC glue. The glue sets in seconds and is most unforgiving if you mess up.
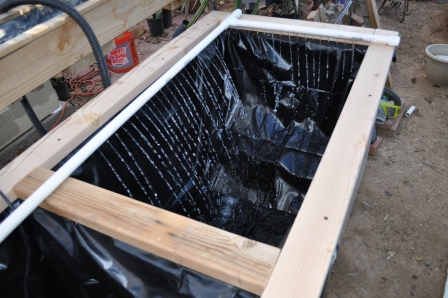
Step 8: drill a series of holes in the pipe pointing down at the water. I have them at about 1″ spacing. Don’t get angle of squirt too close to the edges or your spray will end up drenching the wooden frame. In fact, after I had run water for a day, I discovered that I needed to adjust the angle that the jets were hitting the water. Since everything was still in dry fit stage, this was very easy to do.
Step 9: water test!! Grab the garden hose and start filling the sump. Once you are about 1/3 to 1/2 way full, plug the pump in and let it fill the main compartment. If you are really cautious, let the compartments fill about 4″ – 5″ and inspect the bottom of the fridge for leaks.
Step 10: finish filling the fridge until the main compartment starts overflowing through the 2″ pipe into the sump. Continue filling the sump until it’s at least half way full. Let the system run for at least 24 hours. The water will be ready for fish as all the chlorine usually added to city water will have off-gassed. In fact, it will be fine after about 1 hour. I like to run it for a day just to test the system.
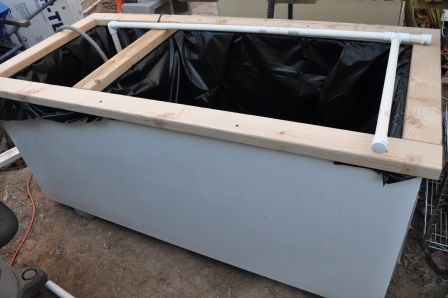
Step 11: once you are satisfied everything is running nicely, cut your 2×4 lumber to size and make a frame out of it. I have a Kreg pocket-hole jig to put the frame together, but you can make it any way you like. I stink making miter cuts. One of these days I will get a nice Miter saw. Screw the frame into the fridge – you will probably have to drill pilot holes. I used 3″ drywall screws to mount it on the frame.
Step 12: finally, when you are happy and everything is running right, use a knife or scissors and trim back the excess pond liner. See how tight everything is when you have water? Best to have slop until you are finished.
Missing fish report!! I know it sounds crazy, but in our main garden pond, we had four goldfish on Sunday, March 9. On Monday, we have only one and it is completely freaked out swimming around. My wife saw a blue heron a few months ago, so we can only assume it came back for another snack. We had a partial cover over this pond and floated corked wine bottles in hopes this would cause any predator to not snag our fish. We’re very sad as these guys were about three years old and had grown from one inch to about four inches. Some of them had very nice looking tails. I hope that bird gets indigestion!
Monday night, I went by Petco to grab six feeder goldfish and six ruby minnows for the Refrigerator tank. We also moved our remaining goldfish from the pond. The Refrigerator has a large piece of insulating foam on the top of it until the frame is completed and has a hinged lid. We are planning on using a piece of Plexiglas in a wood frame.
So, as of right now, fish are happy, but small. The gal at Petco said the minnows could grow to 24″ – we’ll see.
Next steps…
1. Build up the Framework to enclose the pipework
2. Add a hinged lid (with Plexiglas)
3. Pretty up the sides with wood panels made from scrap
4. Paint inside of frame with some water resistant paint or sealer